Tolerance in CNC machining refers to the allowable variation of a parameter within a specific range. This parameter can be a variety of measurable physical properties such as temperature, humidity, noise level, stress, solar radiation rate and velocity, etc., or it can be a physical dimension, such as the size of the space.
Tolerances specify the allowable range of variation in the actual parameter value. In the field of engineering, we can think of tolerance as the control range of error. Tolerances usually have an upper limit, which is the largest limiting dimension, and a lower limit, which is the smallest limiting dimension.
CNC Machining Tolerance
The definition of tolerance has two references in CNC machining: one refers to the tolerance of CNC machine tools, and the other refers to the design tolerance of CNC machining.
The tolerance of CNC machine tools refers to the degree of dimensional accuracy that the machine tool can achieve when machining parts. The accuracy of the CNC machining process is extremely high, and the manufacturing accuracy of some machine tools can reach ± 0.0025mm, which is about a quarter of the size of our hair. However, different machine tools have different tolerances, which are usually defined by the machine tool manufacturer, and the common 0.02mm tolerance in the market is a widely used average value. CNC machining service providers will also provide customers with the tolerances of the CNC machine tools they own.
In design and processing, tolerance refers to the allowable variation range of the part size. As long as the part meets this range, the CNC part can realize all functional requirements. At this time, the tolerance is established by the part designer based on the function, fit and shape of the part. Design and machining tolerances are very important for the fit and assembly of parts. As you can imagine, the parts of electric motors need obviously tighter tolerances than the simple fit of doors and handles. After all, the parts of the engine are numerous and complex, and each feature needs to be well coordinated. Usually, the corresponding tolerance callout will appear next to the applicable dimension of the CNC part.
There are many different types of tolerances, such as limit tolerances, one-way tolerances, two-way tolerances, and a geometric tolerancing system known as Geometric Tolerancing (GD&T).
Extreme tolerance
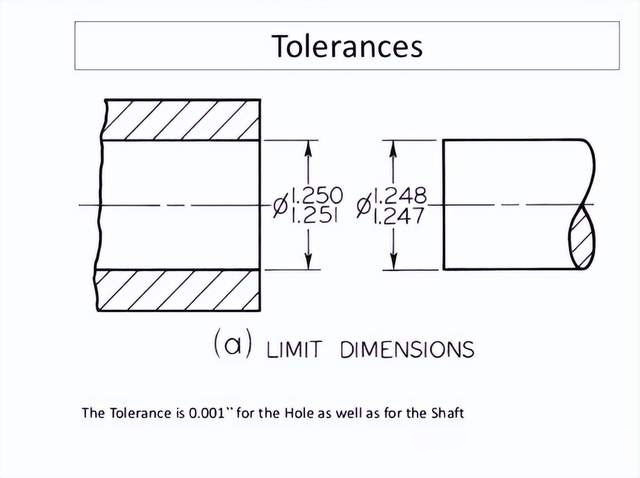
The limit tolerance includes the upper deviation value and the lower deviation value, which defines the acceptable range of the size: the upper deviation value is the maximum acceptable size, and the lower deviation value is the minimum acceptable size. Any value within this range is acceptable. For example: the limit tolerance is marked as 0.55-0.65mm, which means that the size reference will be allowed as long as it does not exceed this tolerance zone.

One-way tolerance
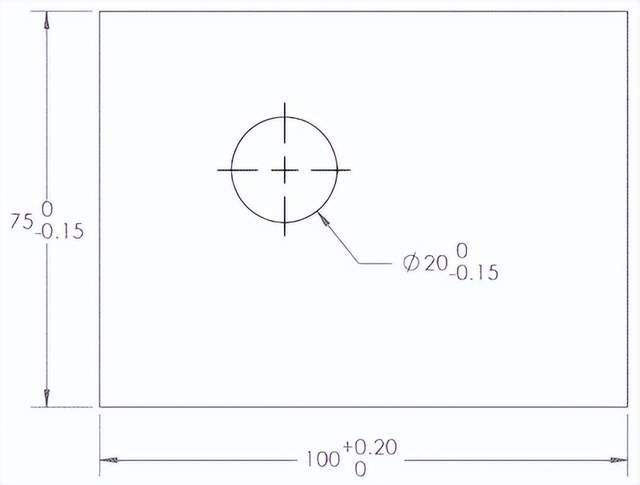
One-way tolerance means that the basic dimension can only change in one direction, that is, the tolerance can only change in the positive or negative direction (compared with the reference value + or –). For example, if the tolerance is written as 1.5 mm +.000/-.005, this is a unilateral tolerance that only allows changes in the negative direction. This means that dimensional deviations can be increased by 0.005 mm in the negative direction defined, but no deviations are allowed in the opposite direction.

Bidirectional tolerance
In the CNC machining process, if the tolerance is symmetrical around the basic dimension, it is a two-way tolerance. That is, the upper deviation value and the lower deviation value of the basic size are the same. Different from the single-phase tolerance, the deviation of the two-way tolerance appears in both positive and negative directions at the same time.
Geometric Tolerancing (GD&T)
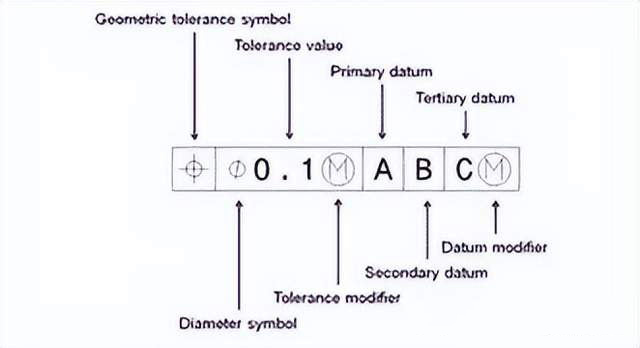
Geometric tolerancing is a more advanced and complex geometric tolerance system than Standard Dimensions and Tolerancing (SD&T). It not only provides the size and tolerance of the part, but also specifies the deviation value of the features such as the point, line and surface of the part. SD&T specifies the shape of the part, while GD&T specifies the geometric characteristics of the part in addition to the shape, such as flatness, fit position, concentricity, etc.

Tolerance Gauge Tips
When designing CNC machining parts, the step of adding tolerance requirements to the parts is called tolerance design. Here are some suggestions and tips we offer for tolerancing:
1.Tolerances are critical to CNC part design. But not all parts or all features of parts need to be toleranced. In order to save CNC machining time and cost, only the key features of the part need to be toleranced, such as when the part cooperates or interferes with other parts or assemblies.
2.Avoid tight tolerances. Strict tolerance requirements often mean more substandard parts, the need to use additional measuring tools or fixtures, and longer lead times—all of which mean more CNC machining costs.
3.When designing tolerances, don’t forget to check the machining capabilities and tolerances of the CNC machine tools that produce the parts. But if you choose CNCMF to order CNC parts, you don’t have to care about details such as the processing capacity of the machine tool. We have more than 5,000 sets of multi-type CNC machining equipment in our global manufacturing network, we can find the most suitable CNC machining solution for customers’ projects and ensure that they meet the tolerance requirements of customers.
4.Keep in mind the properties of the material being processed. The difficulty of machining a CNC part to a specific tolerance depends largely on the part material. Soft materials are more difficult to maintain to specific tolerances due to the potential bending of the fabricated material during CNC machining.

The above is the basic concept of tolerance design, I hope it will be helpful to you.